
Don’t want to spend a fortune on A/B testing software? Don’t want the bloat that comes with free tools? We understand because those were some of the problems we didn’t want to deal with when it came to A/B testing.
Our team needed to create a simple split test. To avoid paying a hefty cost for software or using free plugins that would weigh down our site, I decided to get creative with Google Analytics. My method is based on form submissions by simply tracking a button click as an event in Google Analytics. With some basic development knowledge, this can be set up reasonably quickly. Let’s dive in.
3 Step A/B Testing in Google Analytics
Step 1: Create The Template
We use WordPress for our website, but creating a template can be done in other content management systems too. Based on our CMS, this is the code we used:
Keep in mind this is just an example. It’s not very dynamic and can easily be modified to be re-used more dynamically.
As you can see in the code, I gave each button a 50% chance of showing up. One tracks “A” and the other tracks “B.” For WordPress, this is all you need. Again, this is a fundamental and simple example. In our real-world test, we are swapping out two different contact form layouts.
Note: Depending on what Google Analytics script you are using, the code may vary. The “gtag();” could be “ga();” or “__ga();”, etc. Make sure you know which syntax goes with the analytics script you are loading.
Step 2: Setup the goal in Google Analytics
Now we need to set up two different goals in the admin section of Google Analytics, one for A and one for B.
While on the main dashboard follow these steps:
- Click the Admin cogwheel
- On the right-hand side click the Goals link.
- Click New Goal
- Select Custom Goal → Continue
- Name the goal and make sure to include A or B in the description.
- Select Event → Continue
- Category, Action, Label, Value. These are all the options we put into the code in the button. Category and Action are the only mandatory items.
- Click save.
- Repeat the steps for the “B” button.
Step 3: Test to make sure it’s working properly.
Note: The event can take 24-48 hours to show in your reporting. However, it will show in real-time under the real-time tab: Events & Conversions. Also, make sure if your IP is blocked that you are doing this from a different IP address.
To test, just load up the webpage and test the action. In our case, we would click a button. Reload the page and do this a few times and watch the events come in.
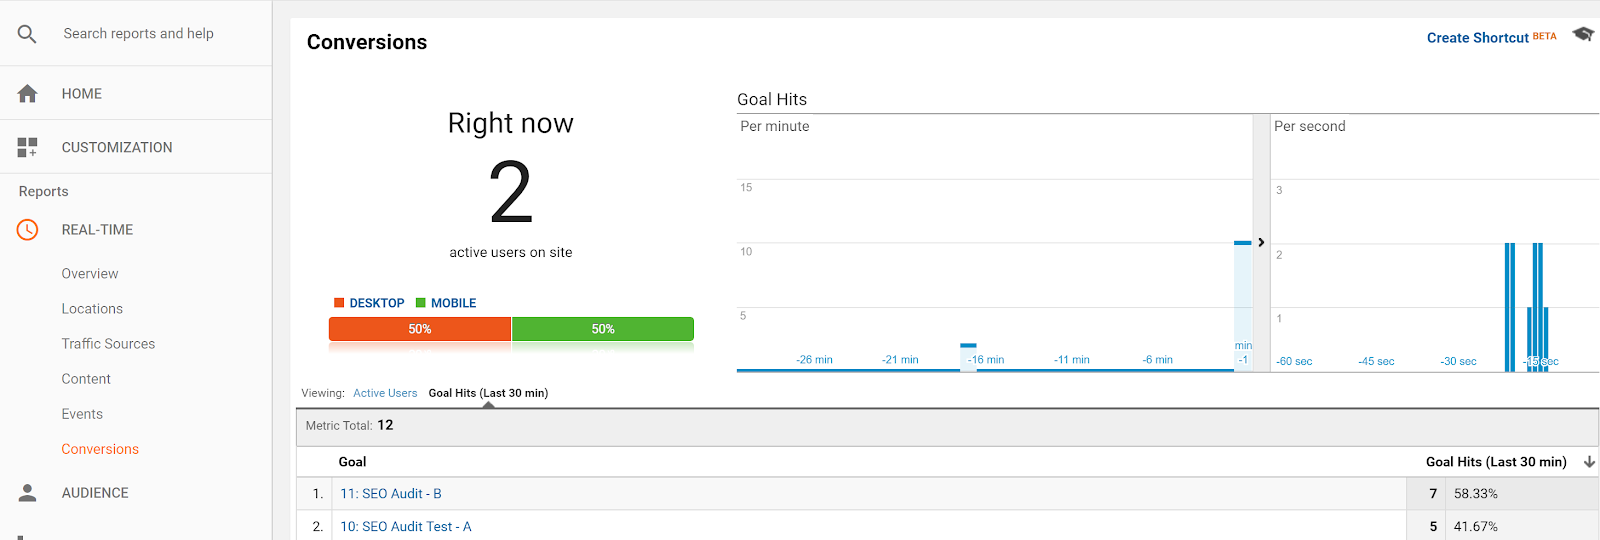
As you can see, I clicked the “B” button seven times and the “A” button five times to make sure it was working properly. That’s all it takes to get a simple A/B test up and running.
Try it out for yourself and, if you have any questions, drop a comment below to discuss. Good luck!
Related Posts
Browser Bookshop: How Niche Platforms Change Online Retail
Online retail has reached a turning point. Consumers no longer want endless choices, cluttered interfaces, or platforms that...
Read More
AI vs. Traditional Agencies: Which Delivers Better ROI for Your Business?
In today’s rapidly evolving digital landscape, businesses face a challenging decision: whether to stick with traditional marketing agencies...
Read More
Scaling Digital Marketing for Law Firms, Logistics, and Healthcare
Scaling digital marketing isn’t just about spending more on ads or publishing more blogs. It’s about building sustainable...
Read MoreOur Awards