If you want to create a highly customized online store with WooCommerce, you may have wondered if you can use Gravity Forms to achieve this goal. The answer is yes. In fact, the two plugins integrate very well together. In this article, we’ll explore the benefits of a Gravity Forms WooCommerce integration, when to use it, when not to use it, pricing, and much more.
About WooCommerce & Gravity Forms
WooCommerce and Gravity Forms are two popular WordPress plugins that work together seamlessly to provide a powerful e-commerce solution for businesses of all sizes. WooCommerce is an e-commerce platform that allows you to create and manage your online store, while Gravity Forms is a form builder plugin that allows you to create custom forms for your website.
Does Gravity Forms work with WooCommerce?
Yes, Gravity Forms does work with WooCommerce. In fact, a Gravity Forms WooCommerce integration allows you to create highly customized product order forms. You can easily add 25 fields to your forms, such as text fields, drop-down menus, radio buttons, checkboxes, and even file upload fields. Gravity Forms also offers conditional logic, which allows you to show or hide form fields based on the user’s input and apply conditional logic to the product submit button. Additionally, you’ll be able to offer conditional pricing based on your form field entries (more to come on that below).
Advantages of WooCommerce & Gravity Forms
One of the main advantages of using Gravity Forms and WooCommcerce together is you can create highly customizable product order forms. This means you can create forms tailored to your business’s needs. For example, if you sell custom-made products, you can create a form allowing customers to specify their order’s exact specifications, including the size, color, material, and other relevant information.

Gravity Forms also supports payment integration with WooCommerce, so you can create payment forms allowing customers to pay for their orders directly from the form. You can integrate with popular payment gateways like PayPal, Stripe, and Authorize.net, making it easy for customers to pay for their orders securely.
Overall, integrating Gravity Forms with WooCommerce is a powerful combination that can help you create a highly customized e-commerce solution for your business. Whether you’re selling physical products or digital downloads, this powerful duo can help you streamline your sales process and increase your revenue.
When to Use Gravity Forms and WooCommerce?
There are many situations when you may want to use Gravity Forms with WooCommerce. For example:
- Custom product forms: If you want to create a highly customized product form with additional fields, such as color options or sizing.
- Order forms: If you want to create a custom order form with additional fields, such as shipping information or special requests.
- Checkout forms: If you want to create a highly customized checkout form with additional fields, such as coupon codes or gift messages.
When Not to Use Gravity Forms and WooCommerce?
There are also situations when you may want to avoid using Gravity Forms with WooCommerce. For example:
- Limited budget: If you have a limited budget, you’ll want to consider the costs involved with having both of these plugins on your website.
- Limited technical expertise: If you don’t have technical expertise in building websites and adding plugins, the setup and implementation could be daunting.
- Stock management: If you plan to track inventory and were thinking of using Gravity Forms to add product variation information (shirt size, shirt color, etc.), then you are better off using WooCommerce.
Benefits of Integrating Gravity Forms and WooCommerce
There are many benefits of integrating Gravity Forms and WooCommerce for online store owners. Below are some of the key benefits to take into consideration.
Greater control over the user experience
When you use Gravity Forms with WooCommerce, you have greater control over the user experience, as you can create highly customized forms that fit your brand.
Ability to collect more data
A Gravity Forms WooCommerce integration allows you to collect more customer data, such as sizing information or special requests.
Ability to offer product add-ons
With Gravity Forms Product Add-Ons, you can offer additional product options to your customers, such as gift wrapping or custom engraving.
Pricing
Gravity Forms offers several pricing options, ranging from $59 per year for a basic license to $259 per year for a developer license.
WooCommerce also offers several pricing options, ranging from $0 for the basic plugin to $199 per year for the WooCommerce extensions bundle. To use Gravity Forms with WooCommerce, you’ll need to purchase a paid license for both plugins.
How to Connect Gravity Forms with WooCommerce
To connect Gravity Forms to WooCommerce, you’ll need to install the Gravity Forms plugin, the WooCommerce plugin, and the Gravity Forms Product Add-Ons plugin from WooCommerce. Once you have all three plugins installed, you can create a new form in Gravity Forms and add the fields you want to include. Then, you can use the Gravity Forms Product Add-Ons plugin to add your form as a product option in WooCommerce. This will allow your customers to interact with the form on product pages, letting you gather more information.
The steps below assume that you have already set up your WooCommerce store and a payment gateway.
Step-by-Step Guide
Here is a step-by-step guide on how to connect Gravity Forms with WooCommerce.
Step 1: Install and Activate the Plugins
First, you must install and activate WooCommerce, Gravity Forms, and Gravity Forms Product Add-Ons plugins on your WordPress site.
Step 2: Create a Form
Next, create a form using Gravity Forms to collect the additional information you desire. For example, add a drop-down field with shirt sizes and a second drop-down field for shirt colors. You could add a text or paragraph field to capture a “Personal engraving message” for a book cover. You could also add a checkbox to offer gift-wrapping services. Gravity Forms is your tool to extend the basic product page and gather more customer information.
Step 3: Add Product Fields
After creating your Gravity Forms form, it must be linked to the WooCommerce product, which happens inside the form and on the WooCommerce Product editing page.
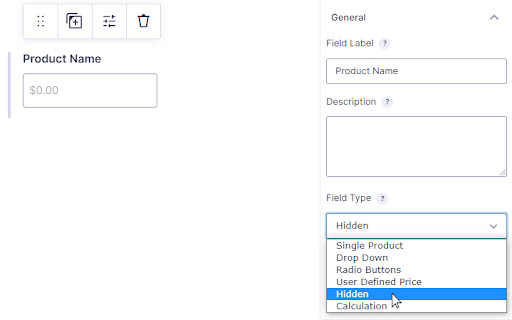
From inside your form, you need to add a “Product” field under the Pricing Fields. Set the Product field type to “hidden.”
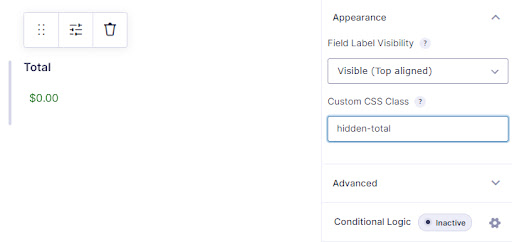
Next, under the Pricing Fields, you need to add a “Total” field. WooCommerce uses these two fields to integrate with Gravity Forms. While they must be present on your form, they do not need to be visible. To hide the Total field, open the appearance tab, and in the “Custom CSS Class” field, enter “hidden-total”:
Conditional Pricing
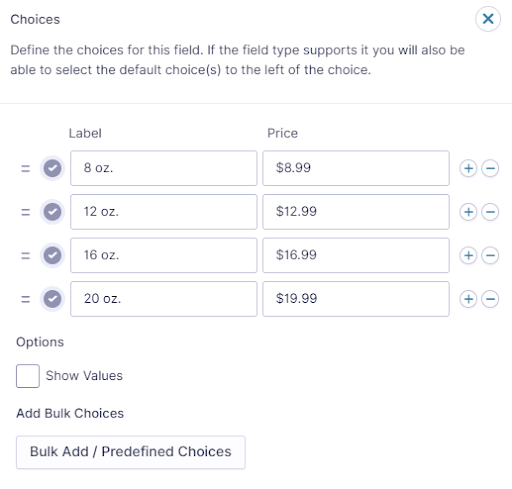
If you want to offer conditional pricing, you can do that through the Gravity Forms pricing fields as well. Select the “Option” field. Under the field’s “General” tab is a button titled “Edit Choices.” Clicking on this loads a menu where you can enter an option label and a related price. For example, you could offer mug sizes at different costs:
WooCommerce will automatically update the pricing and total information based on the settings above when the user makes their selection.
Show / Hide Fields Based on User Selection (Conditional Logic)
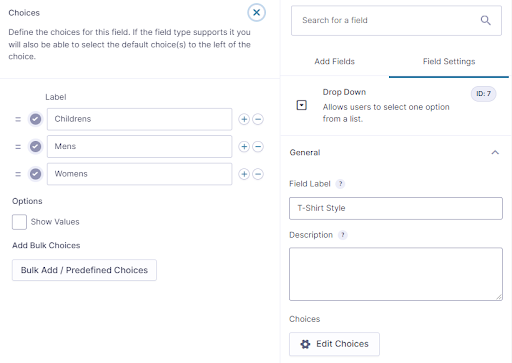
If you want to show and hide fields, you use Gravity Forms’ conditional logic field settings. For example, you could have an initial “drop-down” field for t-shirt style with choices of “Children’s,” “Men’s,” and “Women’s.”
Then you could use three Pricing Option fields, one for Children’s, Men’s, and Women’s shirts, to list available features (fabric material, size, color, graphics, etc.). The pricing fields for the Children’s, Men’s, and Women’s features can be set to appear only when a specific value is selected in the T-Shirt style field that we configured above.
To set this up, click on a Pricing Option field to open the field settings panel. In the lower right-hand corner, click on “Conditional Logic.” Referencing the picture below, set the field you want to make your logic based on (T-Shirt Style) on the left. In the middle, you can choose how to set up your conditional logic (choose “is”). Finally, set what the T-Shirt Style field should be equal to (Children’s):
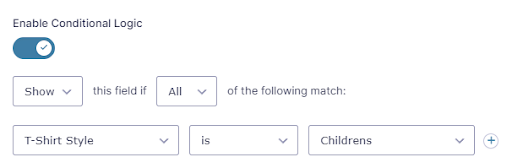
By using this setting, the children’s feature field will only appear to customers when they have first selected the “Children’s” t-shirt style. The other feature options for Men’s and Women’s will remain hidden while the Children’s feature field is visible.
If you follow those steps, you modify the layout and offer your customers a dynamic and intuitive checkout process, which illustrates the power behind Gravity Forms and WooCommerce when seeking to create advanced layouts without any programming knowledge.
Now that we have covered configuring Gravity Forms to work with WooCommerce, we need to set up WooCommerce to use Gravity Forms.
Step 4: Configure Product Options
Configure the normal product options such as price, stock, and shipping details in WooCommerce.
Step 5: Add The Gravity Form to the Product
Below the standard WooCommerce “Product data” box will be a “Gravity Forms Product Add-Ons” box. Here you can choose the Gravity Form you created and whether to display the form title and description on the product page. You also have the option to add text above and below the product’s price to disable calculations and hide various labels. Make your selections, and then save or publish the product.
That’s all there is to it. Customers can now make selections on the product page and see their custom selections displayed on the cart page and at checkout. As a store owner viewing individual orders, the custom form information will appear linked to the product directly below the product’s title.
Integrating Gravity Forms with WooCommerce is a simple process that can significantly enhance your eCommerce website’s functionality.
Using WooCommerce and Gravity Forms to Generate More Business
Integrating Gravity Forms with WooCommerce can help you generate more business by providing a more customized and streamlined user experience. Customers are more likely to purchase when they can easily find their desired products and intuitively follow a streamlined checkout process like Gravity Forms and WooCommerce offers. Additionally, by collecting more customer data, you can gain valuable insights into their preferences and needs and analyze this information. This can help you improve your products and marketing strategies to increase sales.
Working with Website Developers
 If you’re considering using Gravity Forms with WooCommerce but need more technical expertise to set it up, you’ll want to work with a website development company with experience with these plugins. They can assist you with setting up Gravity Forms and WooCommerce, creating customized forms, and seamlessly integrating the plugins into your website. They can also provide ongoing support and maintenance to ensure your website runs smoothly and efficiently.
Create Customized, Streamlined Online Stores
Using Gravity Forms with WooCommerce can provide numerous benefits to your website, including greater control over the user experience, collecting more data, and offering product add-ons. Together, they can help you create a highly customized and streamlined online store to attract customers and generate more business.
However, some limitations exist, such as the additional cost and technical expertise required. If you decide to integrate Gravity Forms with WooCommerce, be ready to purchase a paid license for both plugins and consider working with Oyova for website development services that can help you set up and customize the plugins to fit your needs. It’ll be worth the investment.
Related Posts
Guide to Gravity Forms for WordPress
Related Posts

Social Media Marketing for Home Services: Get Noticed & Get More Leads
If your home service business isn’t showing up on social media, you’re leaving jobs on the table. Homeowners...
Read More
Email Marketing for Home Services: Top 5 Tips to Drive More Leads
If your business relies on referrals and repeat customers, email marketing for home services might be the most...
Read More
Home Services Marketing Trends 2026: Don’t Get Left Behind
The home services industry has never been more competitive or more lucrative. But the companies winning jobs in...
Read MoreOur Awards