
Gravity Forms is one of the most powerful contact forms on the market today for WordPress websites. Easy to use, feature-rich, and ready to integrate with marketing CRMs – Gravity Forms has a lot going for it. As a WordPress developer, I love Gravity Forms because of its comprehensive and extremely well-documented implementation of action hooks and filters, which allow you to extend the functionality and easily modify the content and activity of Gravity Forms.
Want to discover how Gravity Forms hooks and filters can revitalize your website? Pull up your favorite cup of joe, and let’s dive in.
Common Uses for Gravity Forms Hooks and Filters
What are some of the common use-cases I use Gravity Forms hooks and filters for?
- Enqueueing Custom Scripts
- Adding Custom Validation
- Custom Honeypot Fields With ADA Support
- Checkbox To Toggle Field
Enqueueing Custom Scripts
Gravity Forms offers a hook to embed scripts and styles on the pages where your forms appear. I may use this to add custom features like an AJAX lookup to populate a list field or to add form-specific styles. Gravity Forms has us covered.
The basic syntax for loading scripts and styles via Gravity Forms looks like this:
add_action( 'gform_enqueue_scripts', ‘your_function_name’, 10, 2 );
The above code will load scripts on all your pages containing a Gravity Form. Gravity Forms also offers the ability to target a specific form by form_id. To do this, you append the id to the end of the first parameter in the action call as shown below:
add_action( 'gform_enqueue_scripts_1', ‘your_function_name’, 10, 2 );
In the code above, the form with id 1 is being targeted. Scripts enqueued in your function will only load for form 1.
A full implementation may look something like this:
$registration_form_id = 1;
add_action( “gform_enqueue_scripts_{$registration_form_id}”, 'gform_enqueue_scripts_registration_form', 10, 2 );

function gform_enqueue_scripts_registration_form( $form, $is_ajax ) {
   wp_enqueue_style( 'registration-form', '/dist/css/registration-form.css', array(), false, 'all' );
   wp_enqueue_script( 'custom_script', 'dist/js/registration-form.js', array( ‘jquery’ ), false, false );
}
We start by specifying the form id in a variable so we can reuse this with other hooks and filters. Doing this also makes it easy to copy and reuse this block of code or convert it into a class.
If the page we’re loading has the form with id = 1, then it will load the scripts. It’s that easy!
Interested in learning more? Check out Gravity Forms documentation on gform_enqueue_scripts.
Adding Custom Validation
Sometimes, a field needs to be validated for a specific need. Often I use this to limit the options users can make in a field. For example, I’ve used this feature to ensure that particular zip codes are blocked, custom date ranges are used, and even to verify that custom post type (CPT) names have not been previously used when creating CPT from a form entry.
Gravity Forms offers validation with the following filter hooks:
- gform_validation
- gform_field_validation
gform_validation is used when you want to process multiple form fields at a time – the entire form.
gform_field_validation is used when you want to target a single field.
gform_validation
The implementation is different for each. We’ll start with a brief example of gform_validation.
Like the example above, you can target all forms, or by appending the form id, you can target a single form:
add_filter( 'gform_field_validation', 'your_function_name', 10, 4 );

// The following declaration targets all fields in form 1
add_filter( 'gform_field_validation_1’, 'your_function_name', 10, 5 );
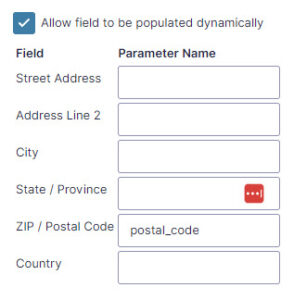
For example, let’s use the validation to ensure a range of postal codes cannot be submitted with the form. First, we will label our zip/postal code field to reference it in our code later. From the Gravity Form edit screen, click on the address field and click ” Advanced ” in the right sidebar. Mark the checkbox titled, “Allow field to be populated dynamically,” add then add the label “postal_code” for the “ZIP / Postal Code” field as shown below.
Next, we add our custom validation script:
function gform_field_validation_block_zip_codes( $validation_result ) {
  $form_id = 2;
	$form  = GFAPI::get_form( $form_id );
	$entry = GFFormsModel::get_current_lead();
	$blocked_postal_codes = array(
		'12345',
		'23456',
		'34567',
  );

  $postal_code = '';
  foreach( $form['fields'] as &$field ) {
    if ( 'address' == $field->type ) {
      // Get the input key for the zip/postal_code field
      $inputs = $field->inputs;
      $labels = wp_list_pluck( $inputs, 'name' );
      $key    = array_search( "postal_code", $labels );
      $input_key = $inputs[$key]['id'];

      // Get current value
      $postal_code = rgar( $entry, $input_key );

      // block stuff
      if ( in_array( $postal_code, $blocked_postal_codes ) ) {
        $field->failed_validation  = true;
        $field->validation_message = __('We cannot ship to this postal code!', 'oyova');
      }
    }
  }

  $validation_result['form'] = $form;
  return $validation_result;
}
While you can hardcode the entry fields into the validation script, we show above how to look up the field by the label we entered. If Gravity Forms were ever to change its structure, this would ensure that the lookup still grabs the correct field entry.
We also want to point out that the example above demonstrates how you can set your custom validation messages on failure.
$field->validation_message = __('We cannot ship to this postal code!', 'oyova');
gform_field_validation
Next is the field-specific hook, gform_field_validation. This hook allows you to target a single field and passes all the data you need into the function, and it tends to be easier to work with. The call looks like this:
add_filter( 'gform_field_validation_1_2', 'your_custom_validation', 10, 4 );
The first number – 1 – is the form id, and the second number – 2 – is the field id you are targeting. Let’s modify the code above to use this filter instead. The change will look like this:
$form_id  = 2;
$field_id = 4; // Address field group
add_filter( "gform_field_validation_{$form_id}_{$field_id}", 'gform_field_validation_address_field', 10, 4 );
function gform_field_validation_address_field( $result, $value, $form, $field ) {
	$blocked_postal_codes = array(
		'12345',
		'23456',
		'34567',
  );

  $inputs    = $field->inputs;
  $labels    = wp_list_pluck( $inputs, 'name' );
  $key       = array_search( "postal_code", $labels );
  $input_key = $inputs[$key]['id'];

  // Get current value
  $postal_code = rgar( $value, $input_key );

  // block stuff
  if ( in_array( $postal_code, $blocked_postal_codes ) ) {
    $result['is_valid'] = false;
    $result['message'] = __('We cannot ship to this postal code!', 'oyova');
  }

  return $result;
}
Here we specify the exact form and field we will validate. $result is an associative array that tracks two values: 1) is the field valid – true/false, 2) a specific error message. $value contains all of the field’s input values. Since we are working with an address field, it includes 5 sub-field inputs (Address Line 1, Address Line 2, City, State, Zip / Postal Code). All of these input fields’ values are passed as an associative array in $value. $form passes the entire form object. $field passes the field object we’re working with.
Having access to the $result, $value, and $field parameters make it a snap programmatically to find the input field key we need. Then we grab the value entered and see if it was one of our forbidden zip / postal codes. If so, we set the $result[is_valid] state to false and can specify a message for the user.
It’s quicker to target a specific field input and set up custom validation using this method.
For more information related to gform_validation and gform_field_validation, check out the Gravity Forms documentation.
Custom Honeypot Fields With ADA Support
Out of the box, Gravity Forms has a honeypot solution. Recently, however, many of our clients have been receiving spam as bots have figured out how to avoid the honeypot field. I attribute this to the fact that “honeypot” appears in the code base. My solution is to create a hidden checkbox field labeled “Expedited Response Requested.” The issue with this approach is that the field is still accessible via tabbing, which we don’t want, and is visible to screen readers, which we don’t want. To fix this we need to modify the field output and add aria-hidden="true" for screenreaders, and tabindex="-1" to disable tabbing to the field. How do we achieve this?
Enter in Gravity Form’s field content filter:
// Run filter on all from fields
add_filter( 'gform_field_content', 'my_custom_function', 10, 5 );

// Run filter on all fields in form 3
add_filter( 'gform_field_content_3', 'my_custom_function', 10, 5 );


// Run filter on form 3, field with id = 1
add_filter( 'gform_field_content_3_1', 'my_custom_function', 10, 5 );
We will use the last filter to target the specific field for our purposes and insert the needed html code. Here is the code snippet to do this:
$form_id  = 3;
$field_id = 5; // Address field group
add_filter( “gform_field_content_{$form_id}_{$field_id}”, 'honeypot_html_filter', 10, 5 );
function honeypot_html_filter( $content, $field, $value, $lead_id, $form_id ) {
  if ( str_contains( $field->cssClass, 'screenreader-hide' ) ) {
    $content = str_replace( '<input','<input aria-hidden="true" tabindex="-1"', $content );
  }
  return $content;
}
The filter passes us the HTML output for the form field. A simple PHP str_replace() allows us to modify the input field, adding the necessary missing code:
aria-hidden="true" tabindex="-1"
You may have noticed that the gform_field_content filter passes 5 variables. With these 5 parameters being passed it’s possible to completely rewrite the HTML output for a field. In our last example, we’ll look at converting a simple checkbox into a toggle switch, combining some of the filters we have used above.
Checkbox To Toggle Field
Let’s convert a checkbox to a toggle field using two of the filters above. While it’s possible to download plugins with this feature or program your own toggle fields with Gravity Form’s API library, this is a quicker route to achieve the same outcome. Our process will have three parts:
- Set up the form field in Gravity Forms
- Enqueue the styles we need to make the field look like a toggle
- Use the field content filter to modify the HTML output
Set up the form field in Gravity Forms
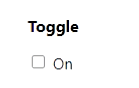
Our simple toggle will work with one checkbox field. When the checkbox is checked, the form will submit “On.” First, create one checkbox labeled “On”:

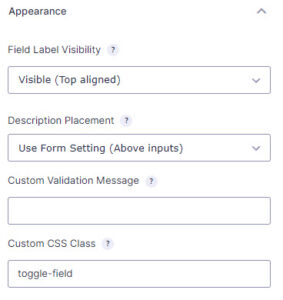
For our stylesheet and custom content to know which field(s) to modify, we’re going to set a custom class of “toggle-field” under the “Appearance” tab. Your settings should look like this:
Now that we have the basic setup, let’s get coding.
Enqueue Styles
We need to add a few styles to our checkbox field to become a toggle, and we’ll do that now before we edit the field. Here is our enqueue stylesheet code:
$form_id = 2;
add_action( "gform_enqueue_scripts_{$form_id}", 'gform_enqueue_scripts_contact_form', 10, 2 );
function gform_enqueue_scripts_contact_form( $form, $is_ajax ) {
  wp_enqueue_style( 'contact-form',  'url/to/stylesheet/form_2.css', array(), false, 'all' );
}
The contents of form_2.css:
/* Form 2 - Contact Form - Custom Styles */

.toggle {
  cursor: pointer;
  display: inline-block;
}

.toggle-switch {
  display: inline-block;
  background: #cf4242;
  border-radius: 16px;
  width: 58px;
  height: 32px;
  position: relative;
  vertical-align: middle;
  transition: background 0.25s;
}

.toggle-switch:before,
.toggle-switch:after {
  content: "";
}

.toggle-switch:before {
  display: block;
  background: linear-gradient(to bottom, #fff 0%, #eee 100%);
  border-radius: 50%;
  box-shadow: 0 0 0 1px rgba(0, 0, 0, 0.25);
  width: 24px;
  height: 24px;
  position: absolute;
  top: 4px;
  left: 4px;
  transition: left 0.25s;
}

.toggle:hover .toggle-switch:before {
  background: linear-gradient(to bottom, #fff 0%, #fff 100%);
  box-shadow: 0 0 0 1px rgba(0, 0, 0, 0.5);
}

.toggle-checkbox:checked + .toggle-switch {
  background: #62c071;
}

.toggle-checkbox:checked + .toggle-switch:before {
  left: 30px;
}

.toggle-checkbox {
  position: absolute;
  visibility: hidden;
}

.toggle-label {
  margin-left: 5px;
  position: relative;
  top: 2px;
}
Now that we’ve got the styles ready let’s add that html markup to transform our checkbox into a toggle.
Use the field content filter to modify the html output
The toggle field needs a handle to move back and forth. We’ll add that. We’ll also wrap our input field and the toggle elements inside a label element, which means that anywhere we click on the toggle, it will check/uncheck the hidden checkbox and animate the toggle switch. Here’s the code:
add_filter( "gform_field_content_{$form_id}",
'oyo_toggle_fields', 10, 5 ); function oyo_toggle_fields( $content, $field, $value, $lead_id, $form_id ) {
  if ( str_contains( $field->cssClass, 'toggle-field' ) ) {
    $field_id = $field->id;
    $choices = $field->choices;
    $label = $choices[0]['text'] ?? 'On';
    $content = '
    <legend class="gfield_label gform-field-label gfield_label_before_complex">Toggle</legend>
    <div class="ginput_container ginput_container_checkbox toggle-container">
     <div class="gfield_checkbox" id="input_'.$form_id.'_'.$field_id.'">
      <div class="gchoice gchoice_'.$form_id.'_'.$field_id.'_1">
       <label class="input-label toggle">
        <input class="gfield-choice-input product-chbx toggle-checkbox" name="input_'.$field_id.'.1" type="checkbox" value="On" id="choice_'.$form_id.'_'.$field_id.'_1">
       <div class="toggle-switch"></div>
       <span class="toggle-label">'.$label.'</span>
      </label>
     </div>
    </div>
   </div>';
  }
 return $content;
}
In the code above, we’re using the gform_field_content filter on our form and targeting all of the form fields. We search through all the fields, and if any of them have the class we set earlier, “toggle-field,” thenthat field’s HTML will be replaced with the code above.
Next, we dynamically render the label next to the toggle. We grab all of the of the field’s choices (input fields) – these are the checkbox input fields. Then we parse that array for the associated label, which will become our toggle label:
$choices = $field->choices;
$label = $choices[0]['text'] ?? 'On';
If you have not used “On” but some other text, the block of code above will grab what you used.
Next, we use the default Gravity Forms output until we insert our label element. At this point, we add all of the elements we need to make a toggle:
<label class="input-label toggle">
  <input class="gfield-choice-input product-chbx toggle-checkbox" name="input_'.$field_id.'.1" type="checkbox" value="On" id="choice_'.$form_id.'_'.$field_id.'_1">
  <div class="toggle-switch"></div>
  <span class="toggle-label">'.$label.'</span>
</label>
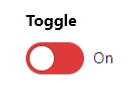
This converts our bland checkbox into a stunning toggle switch:
Getting the Most Out of Gravity Forms Filters & Action Hooks
While we’ve shown a few examples of Gravity Forms filters and action hooks, we’ve only barely scratched the surface. There are more hooks to modify the display of forms on the front-end and back-end, to modify submission results before they are saved, to alter the email (confirmation) results, to change the thank you page, and even hooks that are run after form submissions have been completed.
Want more information? Check out Gravity Forms information on Action Hooks and Filters.
All of these hooks make Gravity Forms a powerful tool when wanting to work with a form builder but still be able to modify all aspects of the HTML output and functionality that the plugin offers.
If you are working with Gravity Forms and need help modifying your form, adding custom fields, or even integrating it with third-party applications, then know that our experts at Oyova are here to help you get the job done with our web development services.
Related Posts
Guide to Gravity Forms for WordPress
Related Posts

Top 10 Reasons Why Your Home Services Website Isn’t Cutting It
In 2026, homeowners don’t flip through the Yellow Pages or ask around the neighborhood before hiring a plumber,...
Read More
Best Ecommerce Platform for SEO in 2026: Shopify, WooCommerce, and WordPress Compared
Choosing the best ecommerce platform for SEO in 2026 is not just about picking the most popular option....
Read More
Marketing Attribution for High-Intent Leads in 2026: How to Track Calls, Forms, and Offline Sales Without Broken Data
If your company depends on quote requests, consultation calls, demo forms, booked meetings, or sales conversations that happen...
Read MoreOur Awards