Infinite scrolling is a design approach that pulls in the next set of content automatically as a user scrolls toward the bottom of the page. The idea is that the user never reaches the end of the page.
Think about Facebook. Have you ever hit the bottom of the page on their platform? The answer is no. They will always load in new content. This can be done automatically or with an action such as clicking on a “More Posts” button.
There are many items to consider when deciding to use infinite scroll over pagination and there are pros and cons to both. How does infinite scroll affect usability? Will it impact my SEO negatively?
This post is meant as a tutorial so I won’t go into too much detail on the pros and cons, but these are the items that must be considered before setting up infinite scroll. Here are some quick pros and cons.
Infinite Scroll Pros:
- Users can casually scroll content, and the ability to infinitely scroll keeps users engaged longer. Pagination requires a page load to access more content, and the page load time could deter users.
- Scrolling is an intuitive and natural action for mobile users. With the increase in mobile usage, this is a win for your mobile users.
- Infinite scroll is great for displaying media. Websites with a large number of photos or videos can really benefit. The user can easily browse through content without having to navigate. Popular websites, such as YouTube and Pinterest, take advantage of this.
Infinite Scroll Cons:
- SEO can take a hit because Google bots don’t know how to load the additional content. Luckily when using WordPress, the paginated blog pages still exist, and Google will still crawl them.
- Information can be difficult to find for users. Infinite scroll can make it impossible for the user to view the footer which often contains important information and links.
- If a user accidentally reloads, hits the back button or even leaves the page to follow a link, they will lose their place, and they won’t be able to return to the same place on the page.
Hopefully before implementing infinite scroll you’ve thoroughly thought about the pros and cons. Luckily for us, WordPress helps us with some of the cons.
Step 1: Install Infinite Scroll
For this tutorial, I am going to use the default Twenty Nineteen theme and make use of the JavaScript library. You can set up infinite scroll with any theme and any plugin.
How you install Infinite Scroll on your WordPress website will completely depend upon your build. You can install it using a package manager such as, npm, yarn or bower, you can download the script and enqueue it in your functions.php, or you can link directly to it with their CDN-hosted file.
You can use the library with jquery or vanilla javascript. For this tutorial, I am going to use jquery so make sure your website has jquery enabled if you are following along.
Step 2: Setup Infinite Scroll
Now that you have the library installed, it’s time to get it working. You will need to take a look at how your main blog page is set up and what elements you need to look for. You will need to find the container that holds all of your posts, the container of the post itself and the “Path” which will be the next button in your default pagination.
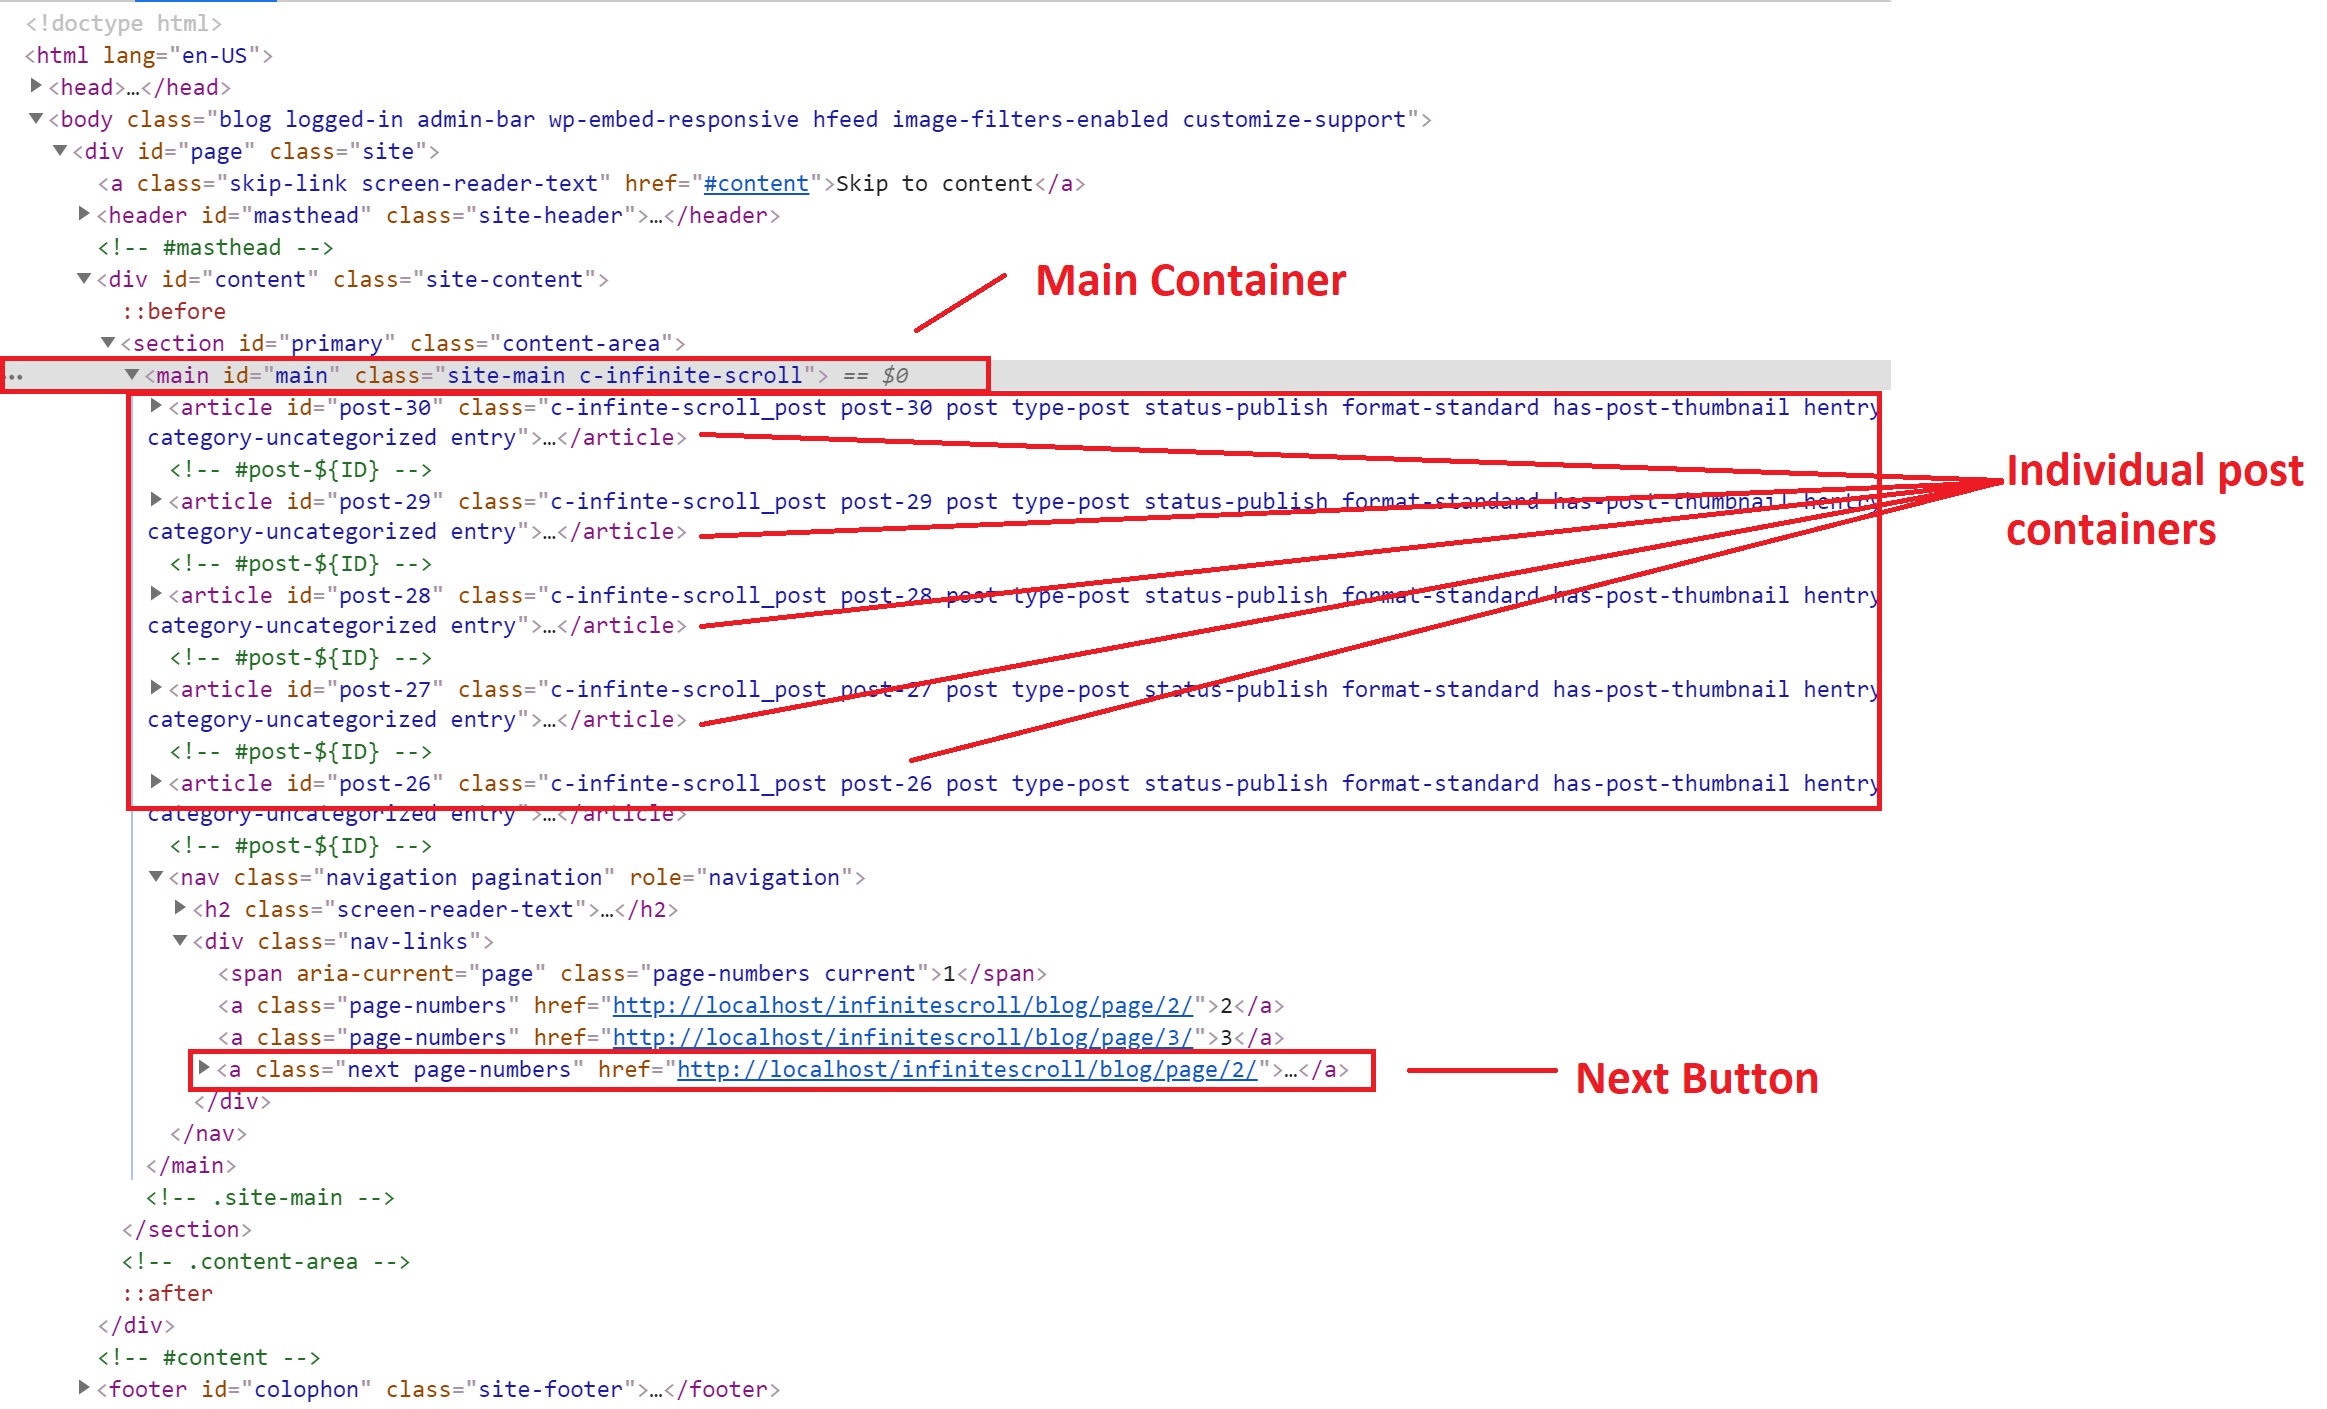
As you can see in the figure above, I’ve highlighted these 3 elements. I also added some classes to these elements to make life easier. This is optional.
Now we need to start coding. Open up the JS file that you write custom code in. Again, this will change depending on how your theme is set up. For the sake of this tutorial, I created a custom.js and enqueued it.
Here are the contents of my js file:
You can see I declared the main container as a variable and called the .infiniteScroll function on it. Append is what gets appended to the main container; in this case, it’s additional posts. Hidenav just hides the pagination from being viewed. Path is the path to the next page. This element contains the links to pages 2, 3, 4, etc. of our blog. There’s a full list of options available.
Surprisingly, that is all we need to do to get the basic functionality set up. This should be enough to get your blog working with default functionality.
Infinite Scroll on click
There are many ways to set up infinite scroll using their options. For example, you may want to load more posts on clickthrough. This can be easily achieved by adjusting the options.
In the code above you can see I made some changes.
- I added the button option which uses the same element as ‘path.’ This is what users will click to load more posts.
- I set loadOnScroll to false. This will stop it from auto-loading the new posts.
Now when you click the next button, it will load the next set of posts.
Items to consider
Now that we got our infinite scroll working the way we intended, there are some other items to consider.
How many posts should be loaded at one time and how do we change that?
WordPress has a way to change the number of posts on each page.
From the WordPress dashboard, navigate to the following page: Settings → Reading
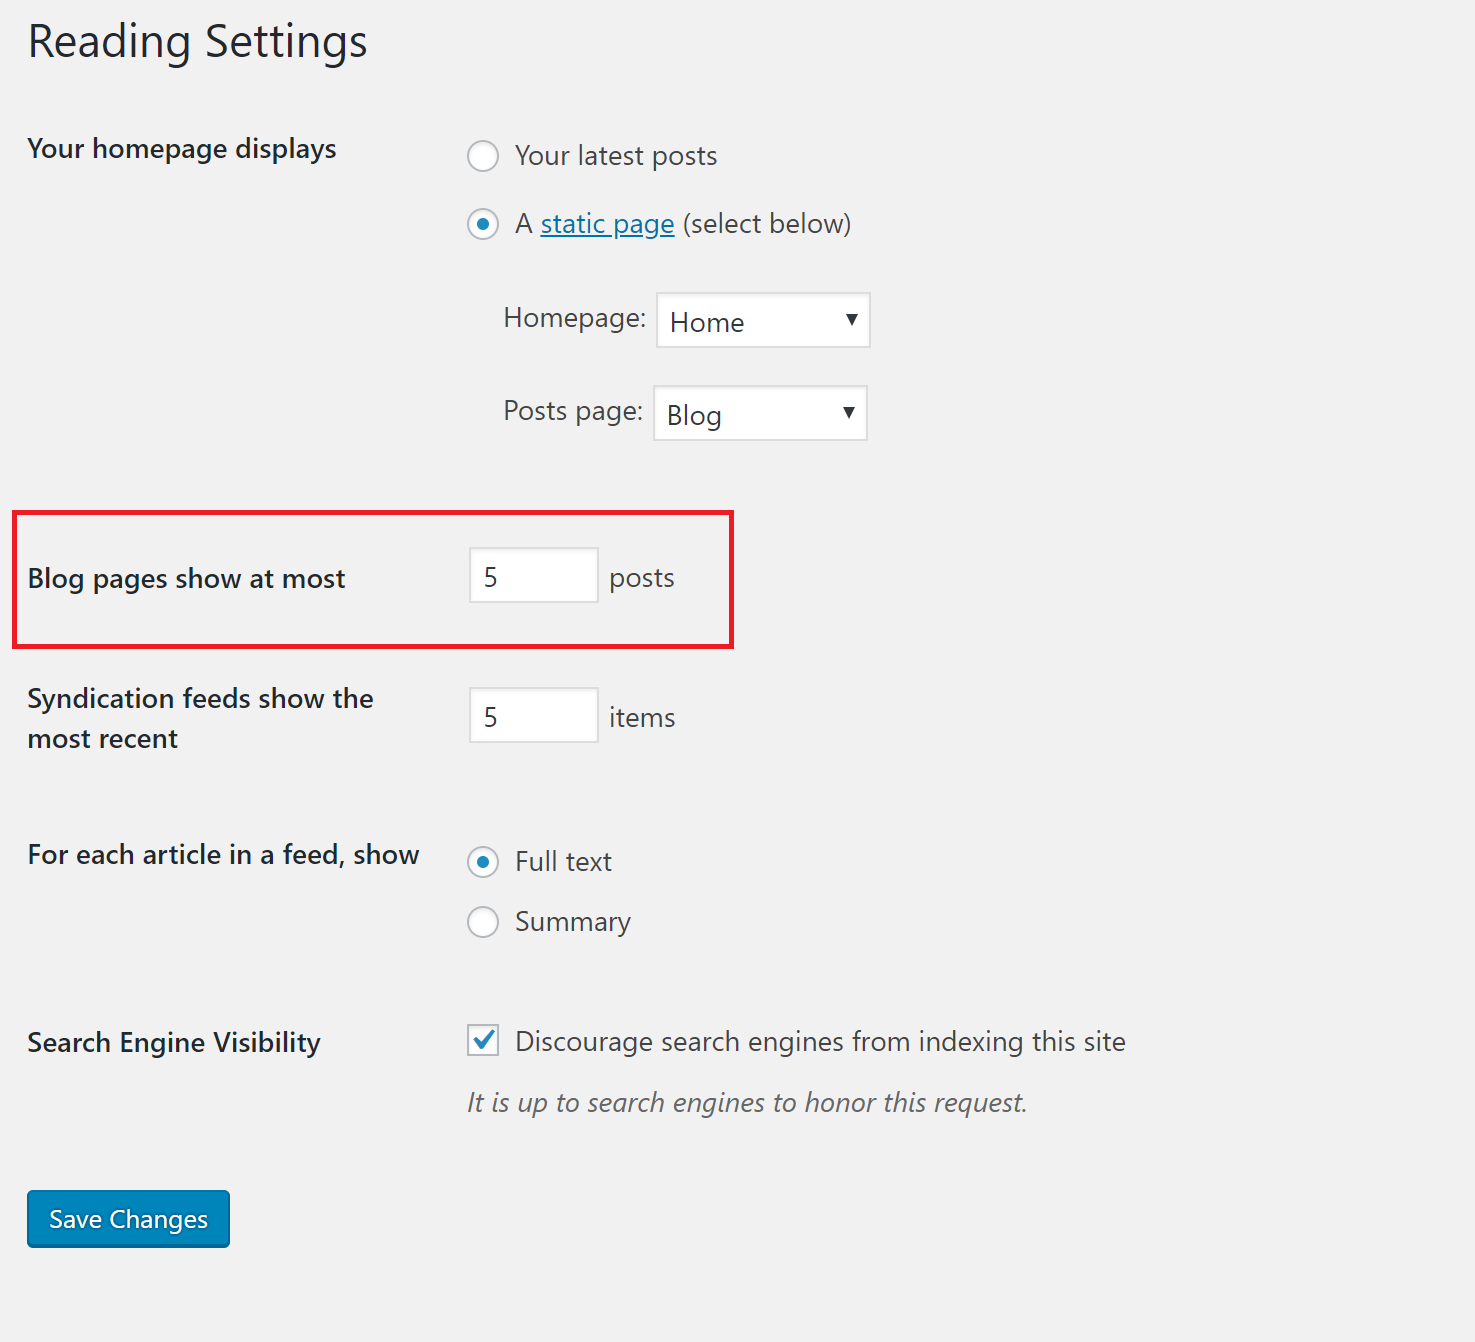
Where it says “Blog pages show at most,” this will determine how many posts autoload. If you set the number to 5 when you first land on your main blog page you will see an initial 5 posts when you scroll or click a load more button, it will auto-load another 5 posts.
Should I adjust the pagination?
This will depend upon your theme, but I personally would change the way the pagination is output if you are going to use the on-click method. If you look at the default pagination in Twenty Nineteen:
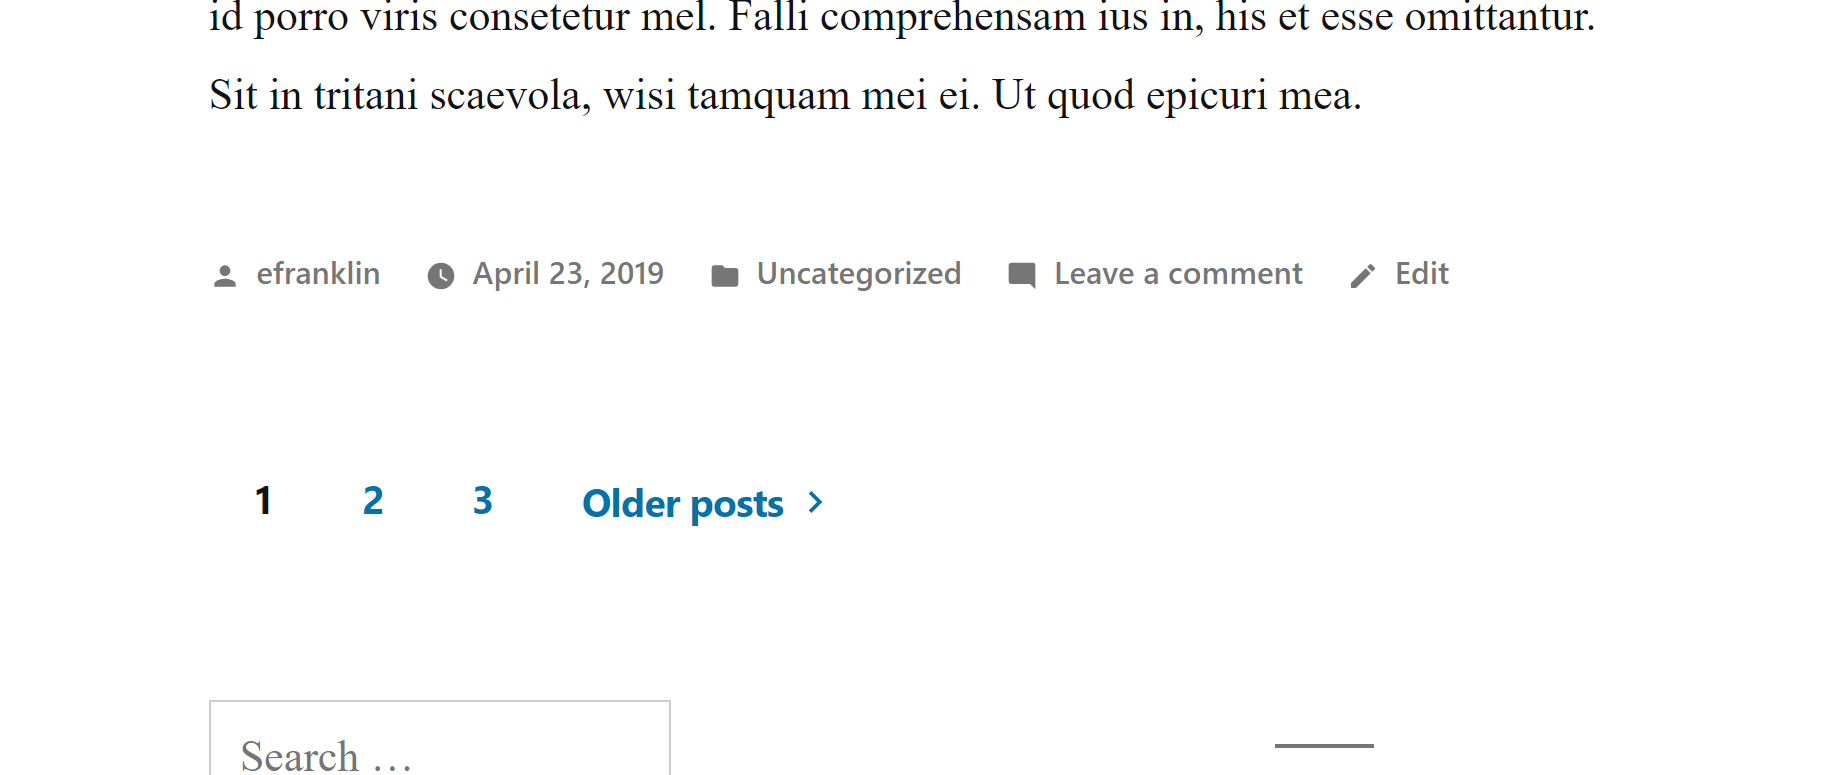
You can see this may not be the best user experience for infinite scroll. Having one item to click is more straightforward. You may want to utilize something like posts_nav_link( ” , ” , ‘Load More’ ). This will create one button with the text, load more which is easier on the end user.
Let me know if you have any questions in the comments!
Related Posts

Top 10 Reasons Why Your Home Services Website Isn’t Cutting It
In 2026, homeowners don’t flip through the Yellow Pages or ask around the neighborhood before hiring a plumber,...
Read More
Best Ecommerce Platform for SEO in 2026: Shopify, WooCommerce, and WordPress Compared
Choosing the best ecommerce platform for SEO in 2026 is not just about picking the most popular option....
Read More
Marketing Attribution for High-Intent Leads in 2026: How to Track Calls, Forms, and Offline Sales Without Broken Data
If your company depends on quote requests, consultation calls, demo forms, booked meetings, or sales conversations that happen...
Read MoreOur Awards